Free Download
Recent Posts


Basic WordPress Guide to Creating New Posts
Creating content on WordPress is one of the most fundamental tasks for anyone managing a website or blog. Whether you’re sharing personal stories, tutorials, or professional updates, WordPress makes it easy to publish and organize content. This guide will walk you through the basics of creating new posts using the WordPress Block Editor (also known as Gutenberg), explain how to use categories and tags, how to set a featured image, and other essential tips to get you started. To get a more detailed run-down of everything the block editor has to offer, head over to the WordPress.org block editor documentation
Step 1: Accessing the WordPress Dashboard
To begin creating a new post:
- Log in to your WordPress website.
- Once logged in, you’ll be directed to the Dashboard.
- On the left sidebar, hover over “Posts” and click on “Add New.”
This will open up the WordPress Block Editor where you can begin creating your post.
Step 2: Writing Your Post Using the Block Editor
The Block Editor uses a visual block-based system, where every piece of content (text, image, video, etc.) is added as a “block.”
Adding a Title
At the top, you’ll see a placeholder that says “Add title.” Type in the title of your blog post here. This will be used in the post’s permalink and SEO settings.
Adding Paragraph Text
Click below the title, and you’ll see a default Paragraph block. You can start typing your content here. Each paragraph you create will be a separate block, which makes it easy to rearrange later.
Adding Headings
Headings are important for breaking up your content and improving readability. To add a heading:
- Click the “+” icon in the editor.
- Search or select the “Heading” block.
- Choose the appropriate heading level (e.g., H2 for subheadings, H3 for sub-subheadings).
Adding Images
To add images:
- Click the “+” icon and choose the “Image” block.
- You can upload a new image, choose one from your Media Library, or insert one from a URL.
- After inserting the image, you can add Alt Text, adjust alignment, and resize it as needed.
Other Common Blocks
- List: Great for bullet or numbered points.
- Quote: Use for highlighting quotes or important statements.
- Cover: Adds an image with overlay text, ideal for headers or section breaks.
- Gallery: For displaying multiple images in a grid.
This video by wpbeginner.com will help you understand the basics of using the block editor.
Step 3: Formatting and Arranging Content
Each block has its own toolbar with options like bold, italic, alignment, and more. You can drag and drop blocks to rearrange them, or use the up/down arrows to shift their position.
Use the sidebar on the right to format blocks in more detail. For instance, when a Paragraph block is selected, you can adjust text size, color, and spacing from the “Block” tab.
Step 4: Adding Categories and Tags
Organizing your content helps readers (and search engines) navigate your site better.
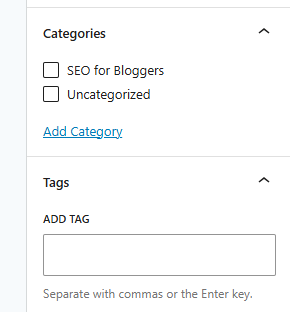
Categories
Categories are broad groupings for your content.
- On the right-hand sidebar, go to the “Post” tab.
- Under “Categories,” select an existing one or click “Add New Category.”
- Use categories like “Tutorials,” “Reviews,” or “News” to structure your site.
Tags
Tags are more specific descriptors that relate to individual post topics.
- Still under the “Post” tab, find the “Tags” section.
- Add tags separated by commas, like “WordPress, Blogging Tips, Block Editor.”
Step 5: Setting a Featured Image
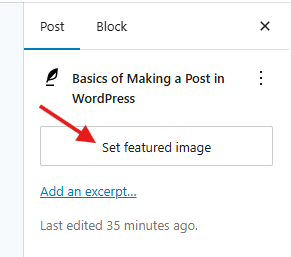
A featured image acts as the thumbnail or preview image for your post on archives, widgets, and social media.
- In the right sidebar, under the “Post” tab, find “Featured Image.”
- Click “Set featured image.”
- Upload a new image or choose one from the Media Library.
- Set descriptive alt text to improve SEO and accessibility.
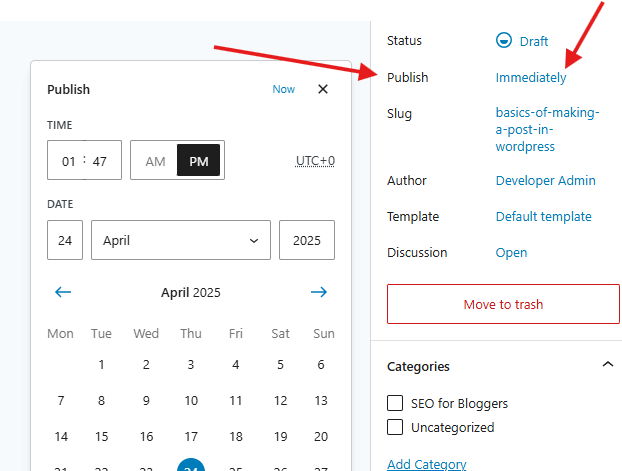
Step 6: Previewing and Publishing
Before publishing:
- Click the “Preview” button at the top right to see how the post will look on your site.
- Check the post on desktop, tablet, and mobile view.
When you’re ready:
- Click the blue “Publish” button.
- Confirm your selection and your post will go live.
Bonus Tips for Beginners
- Use SEO Plugins: Install a plugin like Yoast SEO or Rank Math to help optimize your post for search engines.
- Check Readability: Aim for short paragraphs, use headings to break up content, and avoid jargon.
- Include Internal Links: Link to related posts or pages within your site to keep visitors engaged.
- Use Excerpts: Customize the summary that shows on archive pages by filling in the “Excerpt” field under the Post tab.
- Enable Comments (Optional): You can enable or disable comments under the “Discussion” section in the post settings.
You don’t have to be a coding expert to craft visually appealing blog posts.
Creating a new post in WordPress is straightforward once you’re familiar with the Block Editor and its tools. From writing content and adding media to organizing posts with categories and tags, WordPress provides a user-friendly interface for managing your content. With a bit of practice, you’ll be able to create attractive, well-organized blog posts that engage your readers and enhance your site’s SEO.
Happy blogging!